Most have ooo'd & awed over beautiful upholstered headboards at some point. Unfortunately, we don't have room for a big bulky headboard in our Master Bedroom. I had come to peace knowing that it just wasn't meant to be...
 |
| Centsationalgirl |
But, then I remembered! We have a guest room! YIPEE!
So here is what I did...
Step 1:
Bought a piece of plywood at HD (60" wide by 48" tall for queen bed). I used a tape measurer to create the circular cut outs at the top because I didn't have a compass. I used a jigsaw to cut out the design.
Step 2:
I had some mdf board lying around that I used to reinforce the edges (makes putting the nailhead trim much easier). I screwed them onto the plywood and moved on to step 3.
Step 3:
I bought one roll of 1 inch foam at Hobby Lobby. I filled in the area inside the mdf board with the foam and put down a little hot glue to hold it in place.
Step 4:
I bought queen sized batting at Hobby Lobby. This actually gave me enough to rap the headboard twice for some extra cushion. I used a handy dandy staple gun to attach the batting the back of the plywood.
Step 5:
Now it was time to use the fabulous fabric I found. It is important to make it really tight (my husband helped me with this). Once again I used my staple gun to attach the fabric to the plywood. You can't really tell in the picture but the fabric is beautiful and has a subtle metallic effect to it.
Step 6:
Now for the fabulousness, but be sure to watch out for your fingers! I bought nailhead trim (every 5 holes) on ebay. It was much cheaper than anywhere else and really gives the headboard some umph. I had read on multiple tutorials that it was hard to keep the trim straight. I didn't have a problem because I took a 2 inch nail that I used to measure from the edge every time I had to nail in one of the nail heads. It took about 45 minutes and tadaaaa!
Step 7:
I was getting impatient at this point and didn't take pictures. We attached some wooden legs to the back of the headboard after we decided on the height that looked the best.
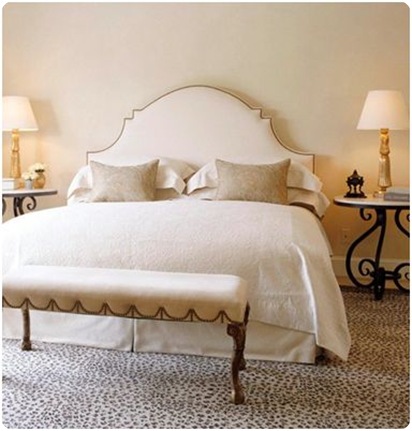
Here is the finished project in a very non finished room (please excuse the bedding, I know it looks blah right now. I will update with better pics when the room is completely finished).
Cost of project:
Plywood from Home Depot: $13
MDF Board: Free
Foam from Hobby Lobby: $11.99 (30% off) = $8.50
Batting from Hobby Lobby: $13.99 (40% off) = $8.50
Fabric from Garden Ridge (2 yards) = $5.99 on sale for $1.99
Nailhead Trim from Ebay: $10.50 + 5.25 shipping = $15.75
Wooden legs: free
Staple gun: free
Staples: $4.99
Grand Total: $52.75