navbar

Mapped @ Image Mapper

12/21/10

Headboard Tutorial

Most have ooo'd  & awed over beautiful upholstered headboards at some point. Unfortunately, we don't have room for a big bulky headboard in our Master Bedroom. I had come to peace knowing that it just wasn't meant to be...
Centsationalgirl


But, then I remembered! We have a guest room! YIPEE!

So here is what I did...

Step 1:

Bought a piece of plywood at HD (60" wide by 48" tall for queen bed). I used a tape measurer to create the circular cut outs at the top because I didn't have a compass. I used a jigsaw to cut out the design.


Step 2:

I had some mdf board lying around that I used to reinforce the edges (makes putting the nailhead trim much easier). I screwed them onto the plywood and moved on to step 3. 


Step 3:

I bought one roll of 1 inch foam at Hobby Lobby. I filled in the area inside the mdf board with the foam and put down a little hot glue to hold it in place.


Step 4:

I bought queen sized batting at Hobby Lobby. This actually gave me enough to rap the headboard twice for some extra cushion. I used a handy dandy staple gun to attach the batting the back of the plywood.


Step 5:

Now it was time to use the fabulous fabric I found. It is important to make it really tight (my husband helped me with this). Once again I used my staple gun to attach the fabric to the plywood. You can't really tell in the picture but the fabric is beautiful and has a subtle metallic effect to it.


Step 6:

Now for the fabulousness, but be sure to watch out for your fingers! I bought nailhead trim (every 5 holes) on ebay. It was much cheaper than anywhere else and really gives the headboard some umph. I had read on multiple tutorials that it was hard to keep the trim straight. I didn't have a problem because I took a 2 inch nail that I used to measure from the edge every time I had to nail in one of the nail heads. It took about 45 minutes and tadaaaa!


Step 7: 

I was getting impatient at this point and didn't take pictures. We attached some wooden legs to the back of the headboard after we decided on the height that looked the best. 

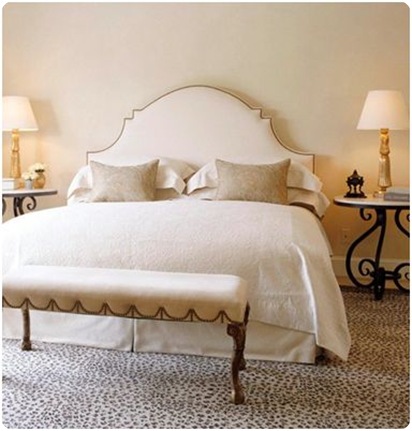
Here is the finished project in a very non finished room (please excuse the bedding, I know it looks blah right now. I will update with better pics when the room is completely finished).


Cost of project:

Plywood from Home Depot: $13
MDF Board: Free
Foam from Hobby Lobby: $11.99 (30% off) = $8.50
Batting from Hobby Lobby: $13.99 (40% off) = $8.50
Fabric from Garden Ridge (2 yards) = $5.99 on sale for $1.99
Nailhead Trim from Ebay: $10.50 + 5.25 shipping = $15.75
Wooden legs: free
Staple gun: free
Staples: $4.99

Grand Total: $52.75


12/14/10

Score!

Check out this mirror....

I saw this the other day on onekingslane.com. It was selling for $599 and was originally $1250. Now check out this mirror!


This mirror was given to us by my husbands grandmother. She was getting rid of a bunch of stuff so we shuffled through it and grabbed a couple things. At first I wasn't sure if I loved it, but it has really grown on me. I am thinking it might need a new coat of paint to livin' it up like the one above! We'll see...

Simple & Cheap - Just the way I like it!

From me to you: Sunburst Mirror Tutorial


I decided to tackle making my own sunburst mirror. I have been drooling over them for a while now, but knew I couldn't fork up the $150 some retail stores charg for them. I have had some circle mirrors lying around since our wedding last May and decided to put one to use! Here are the supplies I used for this project:

- Charger Plate from Michael's - $1
-Circle Mirror - Free
- 4 packs of wooden dowels from Hobby Lobby - $8
-Gold Beads - Free
-Glue Gun - Free

Total Cost = $9 and about an hour of my time!

Step 1: First I drew a grid on the back of the charger and tested out how I wanted to place the dowels.


Step 2: Spray paint the dowels with metallic gold paint


Step 3: Attach wooden dowels to back of charger.
Secure mirror to front of charger. Both done with a glue gun (don't skimp on the glue!)


Step 4: Apply beads to edge of mirror


Enjoy!


(I recommend using a plate hanger to hang. I drilled holes in the back of the charger and attached hanging wire, but it doesn't sit flush against the wall. Plate hangers are super cheap, just make sure you get the right size.)


The DIY Show Off
linking to the DIY showoff


Sassy Sanctuary

12/8/10

Craigslist Find!


I found this mirror listed on Craigslist for $55. I have been looking for an ornate mirror to hang over the new bed in our Guest Room. I thought with a fresh coat of paint this would be perfect. After emailing the seller I found that it was made out of plastic. Very bummed! My search will continue...

Felt Poinsetta's and New Ladder Shelf


These are the new felt poinsettia stockings I made this year. I was inspired by centsationalgirl's tutorial. I found this beautiful velvety gray/beige fabric at Garden Ridge on sale for $.199 (for 2 yards!). I made 4 white felt poinsettias and bought button cover kits to make the middle of each flower. Because the flowers didn't allow me to put names on the stockings, I found some white plastic letters that I painted with gold metallic paint. They fit perfectly in the middle of each flower!

BEFORE:


Unfortunately we do not have a fireplace in our home. I was forced to find a good place to hang our stockings (last year we just gave up!). We recently took apart an old futon that was taking up space in our guest room and we were left with what I call a "ladder shelf". It is missing the whole shelf part, but by attaching some ribbon to each stocking we were able to hang them. Best part, this piece of furntiure was completely free! I will have to come up with some other ideas to use after the holiday's are over.

AFTER:

12/1/10

Why did this take so long?

We were finally able to agree on a Christmas card. I spent hours up on hours searching for the perfect one. As you can see below, the dogs weren't too excited about their photo shoot. But I think the pictures fit their personalities perfectly! I ordered these from tinyprints.com and used a coupon. Very affordable and the quality is fantastic!


11/29/10

Kitchen Decisions


As you can see, we have a builder grade kitchen. I am not looking to spend a lot of money on permanent upgrades (countertops/backsplash), but do what to make some changes. I am still trying to convince my husband to let me rip up the hideous red/pink tile (he thinks he likes it, but really he just doesn't want me to touch it). I am going to touch it! I am also going to paint the cabinets and get some hardware. I am still trying to decide on a color. White, gray, brown?

Here are some of my inspiration photos:

Big decisions to be made! Before and afters to come later...


11/16/10

To buy or not to buy


I found two of these chairs on CL for $35 a piece. I thought they would be perfect for a nursery someday....way in the future. I decided against them and I am glad I did. With the queen sized bed in our GR there wouldn't have been room. I do like the chairs though and with the right throw pillow they could be really great.

11/11/10

Great Deal at TJMaxx


I have been drooling over all of the paisley print bedding from pottery barn & restoration hardware. Unfortunately, my budget doesn't allow me to purchase any of those options.


After lots of searching online and in stores, I found this beautiful sheet set on clearance for $30 at TJMaxx. I will be making this into a duvet cover for our newly redone GR. Pictures to come!


11/9/10

Rock Chalk Renovation


Basement Before:


During Reno:


After: New Hallway


After: Living Space


After: Poker Table


My lovely husband who is obsessed with the University of Kansas Jayhawks was in charge of the decor in this space. Hence the large speakers, framed sports illustrated covers, and poker table. We are both happy with the outcome and love having a place to host our KU watch parties. Here is the breakdown of our purchases:

Labor: free! Thank you Dad.
Materials from HD: $1800 - $500 gift card (thanks to american express)
Leather sectional: $400 on Craigslist
Poker table: $900 at NFM
TV Stand: $270 at NFM
Cowhide Rug: $150 on Ebay
Coffee Table: $60 on Craigslist
Rug Under Poker Table: Free (already had it)
Light Fixture over Poker Table: $70 from Overstock.com
Track Lighting: $50 from HD
Custom Drapes: $70 from Overstock.com (bought 2 panels and sewed them to fit)

It is still a work in progress, but we are so happy to have another space to relax!

10/24/10

Free Dining Room Upgrade

I had been scouring craigslist for weeks looking for a console table to put in our very small dinging room. And then, it came to me! I already had a console table. I stole it from our living room where it didn't serve much of a purpose. 


It is just what the room needed (along with some art and a new light fixture, see below!).


I wonder if I could DIY?!?